
The Garden Shed
A Community Newsletter published by the Piedmont Master Gardeners
April 2017 - Vol 3. No.4


For comments, questions or suggested topics for future Garden Shed articles contact us at: garden-shed@piedmontmastergardeners.org.
If you have specific gardening questions or need help to solve a gardening problem, our Horticultural Help Desk is a free community resource and can be contacted at 434-872-4583 or by email: albemarlevcehelpdesk@gmail.com.

Who We Are
We are members of the Piedmont Master Gardeners, which simply means we have all been trained to share the scientific expertise of Virginia Tech and the Virginia Cooperative Extension Service. More important, we are your friends and neighbors with a passion for gardening – and learning more about it. MORE
Table of Contents
Recipe of the Month
Spring Chopped Salad with Peas
Crisp and Nutritious! Fresh peas are the perfect way to usher in Spring!
Tasks and Tips
The Ornamental Garden in April
With the arrival of warmer weather, there's a lot to do in the April ornamental garden.
In the Ornamental Garden
Crossvine — A Showstopping Native Vine
This large, woody, native vine provides an eye-catching vertical accent in the landscape.
The Vegetable Garden in April
After a long cold winter, April can be a “teaser” month. Some years April appears to have all four seasons rolled into one month; we can have days with 70-80º temperatures, followed by night temperatures dipping below freezing. And once in a blue moon, like in April 1971, we are even blessed with snow. Along with the roller coaster temperatures and more than enough rain to keep us out of the garden, April can be a trying month. It is a month when patience is truly a virtue. April is also the beginning of the busy season for the vegetable gardener.
According to VEC Publication 426-331 the average last killing frost in our area is May 10-May 15. Assuming May 15th as the last killing frost, I used the chart found in that publication to develop the following April planting schedule for our area. Note that the schedule covers both seed-sowing and transplants. If you want to identify transplants that can be planted outdoors this month, look for the vegetables marked with an asterisk.
| April 1-11 | April 12-18 | |
| Asparagus | Beets | |
| Beets | Broccoli* | |
| Broccoli* | Brussel Sprouts* | |
| Brussel Sprouts* | Cabbage* | |
| Cabbage* | Chinese cabbage* | |
| Chinese cabbage* | Carrots | |
| Carrots | Cauliflower* | |
| Cauliflower* | Swiss Chard | |
| Swiss Chard | Collards | |
| Collards | Leeks | |
| Leeks | Lettuce, Bibb | |
| Lettuce, Bibb | Lettuce, leaf | |
| Lettuce, leaf | Mustard | |
| Mustard | Potatoes | |
| Onions set) | Onions set) | |
| Potatoes | Potatoes | |
| Radishes | Radishes | |
| Spinach | Spinach | |
| April 19-25 | April 26- May2 | |
| Beans, Bush | Beans, Bush | |
| Beans, Pole | Beans, Pole | |
| Beans, Wax | Beans, Wax | |
| Beets | Broccoli* | |
| Broccoli* | Brussel Sprouts* | |
| Brussel Sprouts* | Cucumbers | |
| Cabbage* | Swiss Chard | |
| Swiss Chard | Cucumbers | |
| Cucumbers | Eggplant* | |
| Lettuce, Bibb | Muskmelons | |
| Lettuce, leaf | Onions set) | |
| Onions set) | Peppers* | |
| Pumpkins | Pumpkins | |
| Squash, Summer | Squash, Summer | |
| Squash, Winter | Squash, Winter | |
| Watermelon | Sweet Corn | |
| Sweet Potatoes | ||
| Tomatoes* | ||
| Watermelon | ||
| * Denotes Transplants | ||
| The suggested dates may vary for different areas. | ||
Adapted from “Vegetable Planting Guide and Recommended Planting Dates,” VCE Publication 426-331
There’s still time. Tomato, eggplant and pepper can still be started indoors from seeds.
April is the time to set out cool-weather crops such as broccoli, Brussels sprouts, cabbage, cauliflower, lettuce and onions. But we have to wait until the danger of frost has passed to transplant tender plants such as tomatoes, peppers, and eggplant.
Having trouble with plant markers fading? I have always had trouble when labeling with a “permanent” marker; it still manages to fade before the end of the gardening season! Several years ago, I found a “paint marker” in a local building supply store that does not fade doing the growing season. I also discovered a Sharpie marked “paint” at a local craft store that also holds up well through out the growing season.
April is a good time to invest in a soil thermometer. The cause of poor seed germination is often cold soil. If the soil is too cold, seeds of some plants will rot before they have a chance to sprout. A chart providing information on soil temperatures for optimum germination of vegetable seeds can be found in VCE Publication 426-316, titled “Seed for the Garden.”
Feeling unsure about what varieties of vegetables to plant? VCE Publication 426-480 “Vegetables Recommended for Virginia,” provides a list of recommended varieties.
To save space in your garden, you can construct temporary or permanent woven wire “fences,” which will provide vertical support for runner varieties of beans, as well as for cucumbers. Plants can be trained to climb the fences; saving not only space, but also making harvesting easier as the vegetables will be hanging down. For additional information on vertical gardening, see VCE Publication 426-335 “Intensive Gardening Methods.”

Saving Space: Snow peas growing up a temporary fence. Note the sequential planting of “pole” Lima beans at base of fence.
One of the most important steps in planting comes before seedlings even get near the garden. This is the process of hardening off, or gradually acclimating seedlings to outdoor conditions. These little plants have spent their short lives in a warm, sunny, protected place and won’t fare well if they are not exposed slowly to the elements. Start the hardening off process about 2 weeks before you intend to plant them outside. A few days before you are ready to begin hardening plants off, reduce the amount of water you give them, and cease fertilizing until they are planted in the garden. Then put your transplants outdoors in an area where they’ll be protected from the direct sunlight and wind. Leave them out for a few hours and bring them back inside. Repeat this each day, gradually increasing the amount of time they are outside and the degree of exposure to sun and wind. After a week or so, leave the transplants out overnight. If frost threatens, bring the seedlings indoors. Additional information on hardening off can be found at VCE Publication 426-001 titled “Plant Propagation From Seed.”
When transplanting seedlings in peat pots, gently tear off the top inch of the pot; the upper edges of the pot should be covered with soil to avoid wicking water away from the soil surface. Wicking may reduce the amount of moisture available to the roots of the plants.
The best time to transplant is on a cool cloudy day or late in the afternoon to avoid the hot sun. The plants then have time to acclimate themselves to their new environment. If the following day is hot and sunny, a row cover may be used to reduce the stress on the plant. A row cover may also be used to help protect young transplants from a late frost.
Swiss chard is a soft-textured, mild-flavored green. It will give repeated harvest from spring until fall because it does not tend to bolt or go to seed in hot weather as does spinach. There are multicolor varieties of Swiss chard, red, yellow, green; not only do they add color to the vegetable garden, they hold up well in flower arrangements. Give it a try this spring.
Don’t be in too big of a hurry to add mulch to the vegetable garden. Delay organic mulching to allow the soil to warm deeply, but mulch before weeds become established.
Save The Date! Join us at the Piedmont Master Gardener Annual Spring Plant Sale on May 13, 9-12 am at the IX Complex in Charlottesville.
Resources:
Adopted from the Albemarle County Extension Office, “Monthly (April) Horticulture Tip Sheets”, http://www.offices.ext.vt.edu/albemarle/programs/anr/tip-sheets/index.html
Blackberries Part I
Blackberries are a delicious gourmet treat that may be eaten fresh or used in cobbler, cake, sauce, jelly, jam syrup or even turned into an adult beverage. Blackberries not only hold an honored place on our table but also in our memories as well. For me, one taste of blackberry cobbler brings back childhood summer memories of putting on a long sleeve shirt and securing my jeans above my ankles with bailing twine and heading to the creek to pick wild blackberries that grew abundantly along the creek bank. I was reminded more than once that all this berry preparation was to protect me from chiggers, mosquitoes, and ticks, but I aways seemed to come back from the wild berry patch with more that a few scratches and bites. But all was forgotten with that first taste of hot blackberry cobbler smothered in milk. Blackberries are an excellent fruit for home landscapes, because they are relatively easy to grow in small areas and bear delicious fruit. So when you are planning this year’s garden, don’t overlook one of the unsung heroes of the fruit world – the blackberry.
Blackberry Classifications
Blackberries are classified into three types, based on their growth habits:
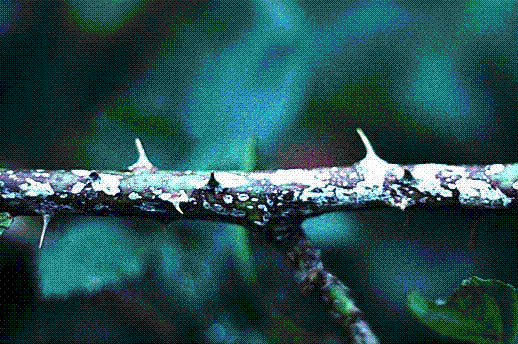
Erect, which produce self-supporting thorny canes that do not require support. They are the most winter-hardy type and have large, sweet berries.
Semi-erect blackberries include cultivars that are thornless and thorny; they produce higher yields than the erect type. The semi-erect types DO require a trellis of some sort for support, but their fruit is large and can range from tart to sweet.
Trailing blackberries have canes are not erect and are the least winter hardy; some have thorns while others are thornless. They require a trellis and have large berries with excellent, sweet berries.

Drawing adapted from Growing Blackberries In North Carolina, North Carolina Extension Service, and North Carolina State University
The Botany of Blackberries
Blackberries typically have perennial crowns and roots that produce biennial shoots. Specifically, the new shoots — called “primocanes”– grow vegetatively the first growing season, then go through a dormant winter season, and then are called “floricanes” in their second year. Floricanes subsequently leaf out, flower, fruit and die during their second year.
Fruit production of blackberries is directly related to primocane growth and vigor. Plants may produce for 15 years if managed well; but the best production is usually during years 3 through 8. Because of the this, site selection is critical.

There are two names for a blackberry cane, depending on whether the cane is in its first or second year of growth. Primocanes: first year of growth; most types produce no fruit on these canes. Floricanes: second year of growth; these canes produce flowers and fruit and then die. Drawing adapted from: “Blackberries 101”, Utah Berry Growers Association
Plant the Best Cultivars for our Area
There are many varieties of blackberries available. But to be successful, you need to choose varieties that grow well in our area. Bear in mind this crucial advice from the Virginia Cooperative Extension:
“Of the many varieties of blackberries and raspberries available, few have proven totally satisfactory for growing under Virginia conditions. Only top-quality, virus-free, 1-year-old plants of the best varieties should be planted.”
Small Fruit in the Home Garden,” Va. Coop. Ext. Pub. No. 426-840
The following chart offers suggested varieties for our area. In addition, a 2014 study of nine varieties of blackberries was conducted by the Virginia Cooperative Extension (“VCE”) and it provides some useful insights on variety selection. “Evaluation of Blackberry Varieties in Virginia,” Ext.VT..ed/HORT-226.

Suggested Blackberry Varieties chart, adapted from “Small Fruit in the Home Garden,” Virginia Cooperative Extension, Publication 426-840.
Thornless blackberry varieties have gained popularity with many gardeners because they allow children and adults to pick berries without the concern of being scratched. However, there are some very tasty and productive thorny blackberry varieties.
Information about the recommended blackberry varieties follows:
- Chester is a thornless, late-bearing, semi-erect variety that is high in yields with a medium fruit size. This variety is resistant to cane blight.
- Kiowa is a thorny, early-season variety that bears the world’s biggest blackberry fruit. Kiowa blooms earlier and longer than other blackberry varieties. The berry ripens in early June.
- Natchez is a thornless, early-bearing variety that produces large fruit that ripens in early June. When fully ripened, it is very sweet and tasty. Natchez is a semi-erect variety and needs trellising for improved production and better fruit quality.
- Navaho is a thornless, erect, mid- to late-season blackberry that produces better quality fruits when trellised. Fruit shape is conic, berry size is medium but very firm, and the flavor is excellent.
- Prime-Ark 45 is a thorny primocane variety that produces firm berries, free of molds and diseases. Berries are large in size with good flavor and are suitable for long-distance shipping.
- Prime-Ark Freedom is the world’s first thornless primocane-bearing variety, released in 2013. This is an erect type that produces very large fruits and has good flavor. The fruit is harvested in the fall and is good for fresh consumption. As a primocane-type blackberry, the Prime-Ark Freedom can produce two crops per year.
Regardless of the variety, it’s best to purchase certified disease-free plants from a nursery. Plants from a friend or neighbor could introduce root rot organisms or viruses into your garden.
Getting your blackberry patch started right is essential. This is one crop where carefully following instructions will truly be worth it. Here’s how the experts at Virginia Tech put it:There is probably nothing that causes more disappointment and failure in small-fruit plantings than the lack of careful preparation and attention to detail at the time the plantings are established.
Site Selection
Blackberries need full sun, at least 6 hours, and tolerate a wide range of soils as long as the soil drains well. Blackberries are sensitive to wet soils. Therefore, drainage is an important factor to consider when you are selecting a site. If blackberry plants are in waterlogged soils for more than a few days, they can die a slow death from lack of aeration (oxygen) or from subsequent attack by root diseases such as Phytophthora root rot. Sometimes you can improve a less desirable site by tilling and amending the soil with organic matter — compost or aged manure — and building raised beds. Blackberries do best in soil that is rich in organic matter.
The pH of the soil should be in the range of 6.0- 6.5. A soil test should be performed before planting. Avoid planting blackberries in a location occupied in the prior two years by any members of the nightshade family — tomatoes, potatoes, eggplants, pepper or other brambles. Members of the nightshade family could transmit verticillium wilt to your new blackberry plants. Also, wild blackberries and raspberries can harbor diseases and pests, so pick a location as far away as practical from any these wild relatives.
Planting
Blackberries have traditionally been sold as bare-root plants, though some producers are now selling container-grown plants.

Bare-root plant in shipping packaging
Blackberries should be planted when dormant — in late fall or early in spring, about four weeks before the average date of the last frost. Work the soil as for garden vegetables, particularly where the plants are to be set. Bare-root plants are best planted in early spring. Container-grown plants may be planted any time between early spring and late summer. Both bare-root and container-grown plants should be set 3 feet apart within the row. If you are planting more than one row, allow 4 to 6 feet between the rows. Plants that are crowded will not produce as well.
For each plant, dig a hole slightly larger than the spread of the plant’s root system. Place the plants at about the same depth they grew in the nursery. The crown should be at least 2 inches below the soil line. Spread out the roots and firm the soil carefully around them to eliminate air pockets. Do not allow the roots to dry out. Backfill with soil and cut the canes down to within 2 to 4 inches of the soil. Water the plants thoroughly.
Most blackberry plants come with a portion of the old cane attached. This can serve as a “handle” in setting out the plants. Soon after new growth begins, the handle can be cut off at the surface of the ground and destroyed as a safeguard against possible anthracnose infection.
Maintenance
To maintain plants, be sure to water in dry weather and use mulch to conserve soil moisture and control weeds.
Soil Management
Blackberries perform well in soils containing 3 percent or more organic matter. Organic matter in the soil can be maintained using a permanent mulch. Mulch should be applied soon after setting the plants and maintained throughout the life of the planting by replenishing annually or as needed. Hardwood or softwood bark should be applied at least 5 or 6 inches in depth. If mulch material is unavailable or if cultivation seems necessary, keep the cultivation very shallow 1 to 2 inches to avoid disturbing the roots and repeat cultivation as often as necessary to control weeds.
Blackberries are easily injured by too much fertilizer. Apply no more than 5 pounds of 10- 10-10 or the organic equivalent per 100 linear feet of row the first year, and no more than 10 pounds per 100 linear feet of row in subsequent years. Apply fertilizer only in the early spring before flowering. Apply the fertilizer evenly to the soil surface in an approximate 3-foot-wide band over the entire row. Because brambles have shallow root systems, allow the fertilizer to remain on the soil surface to avoid damaging the roots. Avoid using fertilizers that contain chlorides. But remember, do not over-fertilize because that can lead to too much vegetative growth, burning of foliage, injury to roots, a decrease in fruit quality, and an increased risk of diseases. A soil test should be performed every 2-3 years; the report will alert you to any nutrient deficiencies.

Richard Jackson and his bramble farm in central Virginia.
Trellising
A simple trellis, used in many home gardens, consists of two wires stretched at 3- and 5-foot levels between posts set 15 to 20 feet apart. Fruiting canes are tied to these wires in the spring. The erect varieties are tied where the canes cross the wires. Canes of trailing varieties are tied horizontally along the wires or fanned out from the ground and tied where they cross each wire. Trellising keeps the berry patch neater, making cultivation, mulching and harvesting easier.

Pruning Erect Blackberry Varieties
In late winter or early spring, prune out dormant floricanes that are diseased, damaged or crowded, leaving four to six healthy canes per plant. Side branches also need to be pruned to a length of 12 to 15 inches to encourage larger fruit. When new primocanes reach a height of 30 to 36 inches, pinch off tips of the new canes to encourage side branch growth and development. Immediately after harvest, the floricanes of erect blackberry varieties should be cut down to the ground. Remove the pruned material from the garden and destroy it.
Semi-erect and trailing blackberries
During the first growing season, semi-erect and trailing blackberry primocanes do not need to be trained to a trellis. However, after the first season, semi-erect thornless blackberries and trailing blackberries must be trained on trellises to assure clean, disease-free fruit and ease of picking.
During the second season, before bud swell, bring floricanes up to the trellis wires and tie them individually with soft string; alternatively you can use plastic tape from a hand-held device specifically designed for tying brambles and grapes. The lateral branches are pruned to 10 to 12 inches at the same time.
Often only a small crop is available for harvest in the year after planting. For this reason, some gardeners cut back to within several inches of the ground canes that would have otherwise fruited. This helps the plants become better established by preventing the severe drain on their productivity that results from fruiting. This practice favors the development of sturdier, more fruitful shoots in the subsequent year.
In the second and succeeding years, new shoot growth is more vigorous. These shoots should be tied to the trellis as soon as they have reached a height of 4 to 6 feet. Fan the canes out from the ground and tie them where they cross each wire. Avoid tying canes in bundles. In summer, as soon as the last berries have been picked, cut out all the old canes. Do not remove new canes that have come up since spring, except to thin to four to eight shoots per crown. The best shoots should be selected so that wires are well covered with evenly spaced shoots. Broken shoots or those too short or too weak for training should be removed.
Ordinarily, no further summer pruning is performed on semi-erect thornless blackberry varieties. However, research indicates that there are potential benefits from periodic summer topping to encourage more lateral branching and the development of shorter, more compact plants.
Harvesting
The berries are ripe when the fruit is fully colored and they come off the plant easily. The best time to harvest is in the morning, during cooler temperatures, but after the dew has dried. After the berries are picked, they should be refrigerated immediately since they can only be stored for three to four days in the refrigerator. Another option is to freeze the fruit and use them at a later date.
With a little effort and the right cultivar, you could be enjoying blackberries for years to come. I should caution, however, that blackberries are very addictive and everyone in the neighborhood will be asking for a sample!
Thanks for stopping by The Garden Shed; we look forward to your visit next month, when we will be examining potential diseases and pests that may be lurking in the blackberry patch. Until next month, happy gardening.
SOURCES
“Small Fruits in the Home Garden,” www. pubs.ext.vt.edu/426-840
http://plantdiseasehandbook.tamu.edu/files/2011/06/Anthracnose.gif
“Meet Richard Jackson,” Central Virginia Ag Spotlight, blogs.ext.vt.edu/central-virginia-ag-spotlight/2013/08/29/meet-richard-jackson/
Spring Chopped Salad with Peas
Peas, used in cuisines the world over, come in a variety of forms. This recipe combines common garden peas with sugar snap peas for a fresh, crisp, appetizing salad. It is dressed with a tart mustard vinaigrette which gives it, to quote the chefs at Crossroads Restaurant in Los Angeles, “texture and bite.” I have served this simple, colorful salad, topped with goat or feta cheese, accompanied by ham biscuits, as a main course. Delicious and nutritious, packed with antioxidants!
Ingredients
1 cup shelled fresh peas
1/2 pound sugar snap peas, strings removed and halved lengthwise
4 radishes, thinly sliced on mandoline
4 celery stalks, thinly sliced on diagonal
1/2 cup celery leaves
1/2 cup fresh flat-leaf parsley leaves
Salt and pepper
Pea tendrils, for garnish
Directions
Bring a small pot of salted water to a boil over high heat. Prepare an ice bath by filling a large bowl halfway with water and adding a tray of ice cubes. Blanch the peas in the boiling water for about 30 seconds; they will become tender very quickly and maintain their nutrients best with the least amount of cooking. Drain the peas and plunge them into the ice bath to shock them–i.e., stop the cooking process and cool them quickly; this procedure also sets the vibrant green color. Drain the peas again and put in a mixing bowl. Add the snap peas, radishes, celery, celery leaves, and parsley. (I have also tossed in other herbs on occasion. Mint, rosemary, and summer savory are all good choices.) Drizzle the salad with the vinaigrette, season with sea salt and pepper, and gently toss to coat the vegetables. Divide the salad among chilled plates and top with pea tendrils, the delicate top shoots of young pea plants.
Whole Grain Mustard Vinaigrette (3/4 cups)
1 Tablespoon whole grain mustard
1 small shallot, minced
1/4 cup white wine vinegar
1 ½ teaspoons agave nectar (may substitute honey or maple syrup)
½ cup extra virgin olive oil
Kosher salt and freshly ground black pepper
Combine the mustard, shallot, vinegar, agave, and oil in a small mixing bowl or Mason jar and season with salt and pepper. Whisk or shake vigorously to blend. Leftover vinaigrette may be kept covered in the refrigerator for up to 1 week.
Resources:
Crossroads Restaurant, Scott Jones and Sarafina Magnussen, 2015
The Ornamental Garden in April
It’s spring and time to finish all the ornamental gardening chores that weren’t completed in March. It’s also the time of year when garden centers and nurseries beguile us with their wanton displays of botanical eye candy. So, let the planting begin!

Crab Apple Tree Displaying Spring Blossoms
GENERAL APRIL CHORES IN THE ORNAMENTAL GARDEN
Top-dress established ornamental flower beds with an inch of compost. Work the compost into the loosened soil about 2 weeks before planting. Also, if you haven’t had your soil tested in the past couple of years, collect a soil sample and submit it for analysis in accordance with the Virginia Cooperative Extension’s instructions (Soil Sampling Instructions). The cost is $10 per soil sample and well worth the investment.
Re-edge flower beds with a sharp-edged spade or half-moon edger, removing any grass or weeds that have encroached into your flower beds. Clarifying the boundary between lawn and flower bed is one of the best ways to give your ornamental garden a neat, polished look.
Mark any clumps of daffodils that need to be divided. Ideally, daffodils should not be divided until after the foliage dies back, which is normally six to eight weeks after the bulbs finish blooming. Once the foliage dies, however, it is often difficult to locate the exact site where the bulbs are planted. While the foliage is still green, mark the outer boundaries of the clumps in some way so that you can easily find them later. This will also help you to avoid accidentally damaging the bulbs when you go to dig them up. Old golf tees or plastic straws are useful for this purpose. Tip: For next year’s garden, plant daylilies (or other favorite summer-blooming plants) in front of daffodil clumps. As the daffodil foliage dies back, it will be camouflaged by the emerging daylily foliage.

Vole entering tunnel
Inspect ornamental garden beds for tunnels or other signs of soil disturbances caused by voles. These prolific rodents are vegetarian and can cause a lot of damage to ornamental plants. They tend to tunnel under mulch and eat the roots of perennials, such as Irises, hostas, sedum, and spring bulbs. In winter, when little else is available for them to eat, they frequently gnaw the bark of young shrubs and trees, again burrowing under mulch to hide their tunnels. To learn about vole damage control methods, see the Penn State extension’s publication on Voles.

Chickweed — Example of a cool-season weed
Remove broadleaf winter weeds before they set seed. These cool-season weeds include chickweed, deadnettle, hairy bittercress, and henbit. They germinate in late summer or early fall, overwinter in your lawn and flower beds, and produce flowers and seeds in spring. Pull them by hand before they develop seeds. You can suppress their growth in your flower beds by applying a layer of mulch over bare ground. Tip: The University of Illinois Extension’s on-line publication on Weed Identification contains a number of useful close-up photos of weeds.
Stay attuned to the weather and protect any ornamental plants that might be vulnerable to a sudden dip in overnight temperatures. A row cover, old sheet, cardboard, or thick layer of newspapers will generally suffice as protection from the cold. Tip: Don’t forget to remove the covers by next morning so that your plants don’t become overheated during the day.
SPRING CARE AND MAINTENANCE OF HERBACEOUS AND WOODY PLANTS
Early spring is the ideal time to divide summer- and fall-blooming perennials while the foliage is just a few inches tall. Wait until later in the summer (July) to divide Irises and Oriental poppies and autumn to divide daylilies and peonies. If you’re new to dividing plants, here are a few general guidelines.
- Water the plants well the day before you divide them. This softens the soil making your task easier on both you and the plants.
- Select a cool, preferably overcast day in early spring to divide your plants so that the divisions become established before hot summer weather arrives.
- Using a spade or gardening fork, dig up the entire plant, being careful to damage the roots as little as possible. If the plant is too difficult to dig up, try removing only a portion or two of the plant, leaving the remainder of the root ball in place.
- Divide plants with shallow root systems by gently pulling or teasing the roots apart by hand. For plants with dense root systems, slice through the thick or woody crowns with a knife, handsaw, or sharp-edged spade. If this doesn’t work, try inserting two gardening forks or pitchforks back to back into the root ball and gently pry it apart. For plants with tuberous roots or rhizomes, cut them apart with a sharp knife, making sure each rhizome or tuber has at least one growth point or dormant bud.
- Plant the divisions at the same depth as the original plant with the crown just slightly above the soil level.
- Thoroughly water in the newly transplanted plants and protect them from bright sun until they become acclimated to their new environment.
For additional information on dividing perennials, see Clemson University Publication HGIC-1150, Dividing Perennials or the Virginia Cooperative Extension Publication 426-203, Perennials: Culture, Maintenance and Propagation.
Pinch back chrysanthemum foliage when the plants are about four to six inches high. This keeps the plant from getting leggy and falling over in autumn, plus it encourages the plant to develop more blossoms. The National Chrysanthemum Society, USA website recommends pinching the foliage back about one inch and then periodically repeating the process each time the plant grows an additional six inches. Although their website recommends this growing and pinching process until the end of August, most other sources recommend stopping this practice around mid-July to give the plants ample opportunity to form flower buds.
Prune hybrid roses when bud growth starts in early spring. Before making the first cut, look at the overall architecture of the plant. Specifically look for and remove dead wood, the smaller or weaker of two crossing branches, thin (smaller than the diameter of a pencil) branches, interior facing branches, and inward facing buds. When making cuts, prune back to just above an outward-facing bud. As you make your cuts, look for any branches that have a hole in them, signaling cane borer damage. The interior wood surrounding the hole will usually be brown or tan. Cut the branch back until you reach white wood. As you prune, clean up any leaves or other debris from around the base of the shrub.
Install stakes or ring-type supports for peonies and train the foliage inside the ring. Don’t put this off! Peonies have a tendency to grow several inches practically overnight. It’s much easier to deal with the foliage when it’s only a few inches tall.

Spring Helleborus blossoms emerging through winter-damaged foliage
Trim back tattered or freeze-damaged Helleborus foliage in early spring. The current season’s flowers emerge from the center of the plant and are more appealing without the distraction of the old foliage. Epimedium, Heuchera, Heucherella, Tiarella, Liriope, Bergenia and some ferns are other perennials with evergreen or semi-evergreen foliage that may need to be cut back or spruced up in early spring. As you tidy these plants, be careful not to snip new, emerging basal foliage or flower stalks by accident.
CARE AND MAINTENANCE OF HARDSCAPE FEATURES
Inspect dry-stack stone walls to make sure they are in good repair. They have a tendency to shift during the winter months. A few minor adjustments may be all that’s necessary, but if you observe any significant shifting of the stones, arrange for repairs before the damage worsens.
Inspect and reposition any stepping stones or pathway elements that shifted over the winter as the result of alternating freezing and thawing cycles.
Inspect birdhouses and thoroughly clean them out if you didn’t get around to this chore in late winter or earlier this spring. Tighten or replace any loose hinges or screws. Assuming the structures are uninhabited, clean them out thoroughly. Remove last year’s nests and any accumulated fecal or clumped matter. Wipe down the inside with a mild bleach solution (one part chlorine bleach to nine parts water). The idea is to remove any parasites, fungi, or bacteria that might be harmful to this year’s avian residents. Rinse well to remove any traces of bleach and allow the structures to air out for several hours before you reassemble them.
Inspect ponds or other water features and clean out leaves and other debris as needed before the water begins to warm up. Seasonal maintenance requirements may differ depending on the type of water feature you have. In general, check pumps to make sure they are clean and working correctly. Pond filters should also be checked to make sure they are clean.
EARLY SPRING PLANTING TIPS
Early in the month, plant cool-season annuals that can tolerate a light frost. Pansies, of course, are the quintessential cool-season annual that comes to mind but there are lots of other choices for early spring. For example, calendulas, larkspur, love-in-a-mist, sweet alyssum and sweet peas all may be direct sown in the garden now. Some cool-season annuals that are best started indoors for transplanting after the last frost date include: forget-me-nots, lobelia, painted tongue, and snapdragons. Don’t forget to harden off the seedlings before planting them outside.
For brilliant color in your garden, consider growing some poppies. If you were lucky enough to see the dazzling display of corn poppies at Monticello last spring (2016), you were in for a treat! Poppies belong to a diverse family of annuals, biennials, and perennials. Here’s a brief description of the poppy species most commonly grown in Virginia:
- Papaver rhoes

Corn Poppy
– This annual form of poppy is commonly known as corn poppy or Flanders poppy – the bright red form associated with Flanders fields. Poppies thrive during cool, moist weather, so sow the seeds very early in spring or even in the fall for bloom early next summer. Popular Shirley poppies are a type of corn poppy with ruffled petals and may be either single or double flowered.
- Papaver eschscholtzia

California Poppy
– This is the native California poppy that grows wild all along the west coast of the United States. An annual form, it blooms from June to autumn in brilliant shades of golden yellow, orange, red, pink, and violet. Deadheading encourages plenty of new blossoms, but let some go to seed in the fall for next year’s garden.
- Papaver nudicaule

Iceland Poppy
– Iceland poppy is a long-blooming, short-lived perennial with delicately ruffled blossoms that can be sown in early spring for a floral display from midsummer into fall. Deadhead to keep the floral display going.
- Papaver orientale

Oriental Poppy
– The Oriental poppy is a perennial form that only blooms for a few weeks, but its large, intensely colored blooms make it an outstanding addition to the spring ornamental garden.
- Stylophorum diphyllum

Celandine Poppy
– The Celandine poppy is a native perennial wildflower with brilliant yellow flowers and handsome, deeply cut foliage. It is perfect for naturalizing a partially shady garden in spring, after which it goes dormant for the rest of the growing season. Unlike the other poppy species, which prefer full sun and well-drained soil, this native prefers moist, humusy soil and part shade.

Leadminer Damage on Columbine Foliage
SPRING PESTS AND DISEASES
With the arrival of spring comes the start of the annual battle with insects, such as leafminers. Leaf miners are the larvae of moths (Lepidoptera), sawflies (related to bees and wasps and members of Hymenoptera suborder Symphyta) and flies (Diptera). The larvae tunnel into and devour the inner layers of the leaves, leaving round or winding, white tunnels. The tunnels are commonly found on the foliage of columbine (Aquilegia) and roses. While the damage doesn’t actually harm the plant, it can look unsightly. Chemical controls, such as Spinosad or BT, can be used but may not be necessary. It’s usually easier to snip off the damaged leaves or simply ignore the problem if it’s not too pervasive.

Boxwood Leafminer Damage
Boxwood leafminer damage is a more serious problem. The small, delicate adult flies are generally seen in late April and early May, but it’s their larvae that cause the damage. As the larvae feed on the leaves, they cause unsightly blisters to develop in the leaf tissues. While chemical means may be employed to combat this pest, organic methods may be sufficient. Green lacewings and spiders are natural leafminer predators. Other strategies include timely pruning of damaged foliage in spring and selecting boxwood species that are resistant to leafminer damage. A number of reliable sources for information on boxwood leafminers are available including Virginia Cooperative Extension (VCE) Publication ENTO-42NP on Insect and Mite Pests of Boxwood; VCE Publication 426-603 on Selecting Landscape Plants: Boxwoods; the Missouri Botanical Garden’s publication on Boxwood Leafminer; and the North Carolina State University’s Department of Entomology Insect Note, also called Boxwood Leafminer. Tip: For help identifying insects, see Bugs and Other Insects from the State of Virginia.

Peony Botrytis Damage
PEONY BOTRYTIS BLIGHT – If you witnessed botrytis blight on your peonies last year, it’s likely that the disease will recur this year. The fungus that causes this disease of peonies, Botrytis paeoniae, manifests itself in several ways: brown or black masses of fungal spores on peony leaves and stems, collapse and rot of young shoots at ground level, or bud blast (flower buds that turn black or brown and prematurely abort either shortly before or after they open). To treat for this disease, spray newly emerging peonies with an approved fungicide when the plants are 2 to 4 inches tall. If you’re not sure what fungicide to use, contact the local Virginia Cooperative Extension office Helpdesk (albemarlevcehelpdesk@vt.edu) for advice. You may need to do follow-up treatments as a precaution. Always follow instructions for the use of fungicides precisely as they are written on the container and make sure the fungicide is specifically for the type of fungal problem being treated. The Missouri Botanical Garden’s website provides a very good in-depth description of Botrytis Blight of Peony as well as photos and several integrated pest management strategies for preventing or controlling the disease.
SPRING HOUSEPLANT CARE
Although April can have some very warm days, don’t be in a hurry to move your houseplants outside just yet. Night-time temperatures need to be consistently 50 degrees or higher, which normally doesn’t occur until either very late in April or in May. In the meantime, begin readying your houseplants for the move outdoors. Repot any plants that are root-bound. Increase the pot size by one inch and use fresh potting soil. If you plan to re-use pots from previous growing seasons, scrub them out thoroughly first.
With the advent of spring, your houseplants should begin to show new growth. Begin to fertilize them with a slow-release fertilizer or with fish emulsion.
Begin fertilizing orchids that have finished blooming. With every watering, use either fish emulsion or a very dilute (about one-quarter strength) fertilizer made specifically for orchids.
Crossvine — A Showstopping Native Vine
Vining or climbing plants serve a very specific purpose in the landscape. They add a vertical accent, which often provides interesting textural and dimensional aspects to what might otherwise be a flat or uninteresting garden vista. Many climbing or vining plants have fragrant blossoms and present lots of color at eye level. The sight of a climbing rose on a trellis, a wisteria vine on an arbor, or a twining clematis on a tuteur almost always elicit admiring glances from passersby.
While vines offer a lot to the landscape, the problem with some of them is that they may grow too large for the space they’re given. All too often, they require lots of maintenance to keep them sized properly. In addition, many of them must be trained onto a support of some sort. Furthermore, if they are deciduous, they may not add much interest to the garden a good part of the year. The ideal solution to these problems is to choose a long-flowering, evergreen vine that is well mannered and stays put in the space allotted to it. Not many vines fit this description, but Crossvine (Bignonia capreolata) comes very close.
DESCRIPTION OF CROSSVINE
Crossvine is a heavy-flowering, woody perennial vine that stretches 30 to 50 feet high and spreads from 6 to 9 feet wide. Native to the United States, it is generally found growing wild in the southeastern part of the country and the south central states as far west as Texas. In its native habitat, it can be found in forested flood plains and uplands as well as along fencerows and limestone escarpments. Crossvine gets its name from the cross-shaped pattern on the inside (pith) of the stems.
The evergreen, or semi-evergreen, foliage is glossy and dark green in summer, darkening to maroon or purple in winter. The individual leaves are 4- to 6-inches long by 2 inches wide and are positioned opposite one another with a third leaflet that is modified into a tendril with a claw at the tip. To quote botanist Larry Mellichamp in his book Native Plants of the Southeast, “Only one vine climbs by claws on the tips of its tendrils and this is crossvine: it grabs the bark and climbs, later using roots for a tighter grasp.” (p. 200). These unique anatomical structures enable crossvine to cling to fences, walls, trees and other vertical structures without support.
The most prominent feature of crossvine is its generous spring display of fragrant, trumpet-shaped flowers, which bloom on old wood. Lasting up to four weeks, the showy orange-red, yellow or orange flowers are 2 inches long and 1-1/2 inches wide and hang in clusters of two to five flowers. The flowers of the species are generally orange-red and may have a contrasting yellow interior. The blossoms have a distinctive mocha scent, according to renowned plantsman Dr. Michael A. Dirr.
SPECIES RELATED TO CROSSVINE
A member of the trumpet creeper family (Bignoniaceae), crossvine is sometimes mistaken for the trumpet vine, which is also called trumpet creeper (Campsis radicans). Trumpet vine is gorgeous but best avoided in the landscape. Although it is native to the southeast U.S. and a very rich nectar source for hummingbirds, it grows very aggressively, drops its seeds all over the place, and is generally too invasive for the landscape. Although a vigorous grower, crossvine is much better behaved than trumpet vine and is much less vigorous. Crossvine tends to hug whatever structure it is climbing versus trumpet vine, which sends shoots out in all directions.

Crossvine Flowers

Trumpet Creeper Vine Blossoms
Here are some ways to distinguish between the two:
- Habit — While crossvine suckers, its roots only creep out a short distance from the base of the plant. Trumpet vine, however, is a large, woody vine capable of sending underground runners a longer distance from the main plant.
- Foliage – Crossvine is evergreen or semi-evergreen. Trumpet vine is deciduous. Crossvine has compound leaves that are split into two parts. Trumpet vine has leaves that are opposite, pinnately compound, coarsely toothed, and composed of 7, 9, or 11 leaflets.
- Blossoms – Crossvine flowers are reddish orange, often with contrasting yellow interiors. Trumpet vine blossoms are solid yellow, yellow-orange, or red.
- Bloom Time – Crossvine blooms in the spring with repeat blooms throughout the growing season. Trumpet vine blooms in the summer and fall.
- Invasiveness – Crossvine is not considered to be invasive. Trumpet vine, on the other hand, is considered to be very invasive, although some of the newer hybrids are reported to be less of a problem.
- Supports – Crossvine climbs by tendrils which curl or wrap around supports. Trumpet vine has aerial roots with disks that adhere tightly to vertical surfaces and can be difficult to remove.
CROSSVINE CULTIVARS
The flowers of the species appear more reddish-brown on the outside of the trumpet and orangey-yellow in the center of the blossom. While the species is fragrant, the cultivars are generally not.
- ‘Atrosanguinea’ grows much shorter than the species, topping out between 15 and 30 feet, with dark purplish-red flowers.
- ‘Tangerine Beauty’ is a very popular, older cultivar with smaller flowers that are a blend of apricot and golden rust with yellow throats.
- ‘Helen Fredel’ is considered a showstopper because of its very large (2-1/2” long) orange flowers with yellow throats.
- ‘Dragon Lady’ is more restrained in size than the species, topping out between 20 and 35 feet. It has brick red or orange flowers with a faint touch of yellow in the throat.
- ‘Jekyll’ gets its name from Jekyll Island in Georgia where it was selected. It has orange flowers and is more reliably evergreen and cold hardy than other crossvine cultivars.
- ‘Shalimar Red’ grows to about 30 or 40 feet and repeat blooms through the summer. The flowers are coral to red.
CULTURAL REQUIREMENTS
Although found in the shade in a native setting, crossvine grows best in full sun. While it certainly can tolerate partial shade, it will produce fewer flowers.
It thrives in a variety of soils and generally prefers moist, well-drained soil that is near neutral pH (6.8 to 7.2). It can tolerate standing water or flooding for brief periods of time. After it is established, it is drought tolerant. It is hardy in USDA zones 6 to 9.
Unless you really do want a 30- to 50-foot long vine and have plenty of space for it in your landscape, crossvine should be pruned to keep it in check. To shape the vine, prune it after it finishes flowering in the spring. If you wish to increase the development of more flower shoots, train the stems so that they don’t crowd one another. If you don’t want the vine to spread, remove the root suckers.
Crossvine has no serious insect or disease problems.
CROSSVINE PROPAGATION
Crossvine may be grown from seed or from stem cuttings. To grow from seed, collect the seed pods in late summer or early fall after they have turned light brown and begun to dry. The seeds will remain viable for up to a year if stored in sealed, refrigerated containers. They don’t require any pretreatment in order to get them to germinate.
To propagate crossvine from softwood stem cuttings, cut off a healthy, 6- to 8-inch long growing stem (current season’s growth) in spring or early summer. Leave several leaves on the tip of the stem but remove the leaves from the bottom two inches of the stem. Treat the cut end of the stem with rooting hormone to encourage root development. Insert the cut end about 2 inches deep into a moist growing medium. Mist the cutting frequently or slip a plastic bag over the potted cutting to keep it from drying out before it can develop roots. The cutting should take root within six to eight weeks.
USES FOR CROSSVINE IN THE LANDSCAPE
Vines, while quite versatile, are often considered as an afterthought in the landscape. That is unfortunate, because the foliage of evergreen vines such as crossvine can be used to reduce a homeowner’s energy costs. When used on an outside wall of a house or other building, it can help insulate it from summer heat or winter cold. In addition, crossvine can be used as:
- A vertical feature to cover or soften the appearance of fences, large trellises, walls, arbors, or other hardscape features.

Crossvine on Trellis
- A living wall to provide privacy.
- An alternative to a tree or shrub in a space that is too narrow to plant anything else.
- A transition point as you move from one area of the landscape to another.
- A ground cover to stabilize a slope. It will scramble across the ground if no vertical structure is handy for it to cling to.
- A screen to hide an unsightly view or feature.
- An espaliered, open, criss-crossing diamond pattern against a large blank wall.
- A nectar source for hummingbirds, butterflies, and bees.
BENEFITS AND DRAWBACKS OF CROSSVINE
As with many other vines, there are pros and cons to growing crossvine.
Benefits:
- Crossvine is a fast, vigorous grower that can rapidly cover a vertical surface. This is an asset if you want to cover a large space as quickly as possible. In this age of instant gratification, fast growth is viewed as a positive attribute.
- One of the most floriferous of the vining plants, it is practically smothered in large clusters of colorful blossoms.
- Although it is related to and sometimes mistaken for trumpet vine (Campsis radicans), that species can be invasive whereas crossvine is not.
- This native plant is an excellent early spring nectar source for hummingbirds and butterflies.
Drawbacks:
- Crossvine increases in width by suckering, which may need to be controlled. It all depends on the amount of space you wish to allocate to this vine.
- Give this vine PLENTY of space to climb. Otherwise, you’ll spend your time whacking away at it to keep it within bounds.
- Crossvine may be susceptible to deer browsing, but sources vary widely on the subject. Whether or not this plant is actually deer resistant may depend on the location of the plant, the particular browsing habits of your local deer population, and their hunger factor.
SUMMARY
While not a vine for the faint of heart or the gardener with a limited amount of space, crossvine is a congenial giant that can provide a generous display of color in the right setting. To see an example of crossvine in Charlottesville, check out the Culbreth Road Parking Garage near the University of Virginia’s Drama Building, where it freely scrambles up trellises affixed to the garage walls and commands the attention of passersby.
RESOURCES
Flora of Virginia (Weakley, Alan S., Ludwig, J. Christopher, and Townsend, John F., 2012)
Manual of Woody Landscape Plants, 6th Edition (Dirr, Michael A., 2009)
Native Plants of the Southeast (Mellichamp, Larry, 2014).
The New York/Mid-Atlantic Gardener’s Book of Lists (Appleton, Bonny and Chaplin, Lois, 2001).
“Ten Native Vines to Attract Butterflies,” Wildlife Habitat Council Blog, www.wildlifehc.org
United States Department of Agriculture Plants Database Website, USDA Plants Database
“Wildlife, Pollinators and the Products of Pollination,” North American Pollinator Protection Campaign Fact Sheet www.fs.fed.us/wildflowers/pollinators
Raised beds
You just cannot manage a big vegetable garden next summer — either because of sheer laziness or the need to slow down — but neither can you do without fresh produce you grew yourself. Or, maybe you’ve dreamed of raising your own veggies, but you’re inexperienced. One answer to these dilemmas is a raised bed garden, big enough to grow a few tomatoes, a little lettuce, maybe carrots or beets, but not overwhelming you with work. Note the following advantages of a 4X8 raised bed:
- Less space to plant and weed with higher yields
- You don’t stoop and bend down so far
- Soil warms faster and works easier, starting the growing season sooner
- Less water and exactly where you need it, while having better drainage
- Raised beds can be handicapped accessible
- Solves the problem of rocky or rugged terrain (see photo of rock walls)
- You concentrate on best gardening practices
That last benefit depends, of course, on diligence; but sometimes it helps to practice on a small project before biting off too much. The first step is choosing a place where your bed will get at least 6 hours of sunlight, preferably more, and frequent, accessible watering. The soil will dry out faster because the bed gets moisture exclusively from rain or from your efforts. A couple of two-gallon watering cans applied daily usually will take care of a single bed even in dry spells; and you don’t want to carry water too far. Water and sun are essential to a good site.
Materials: Constructing a raised bed involves some choices if you go with wood. There’s lumber treated with chemicals that prevent rot due to contact with the soil, and this lumber lasts longer, but those chemicals leach into the soil. The good news is that wood treated with arsenic-based chemicals, such as chromated copper arsenate (CCA) are not available for residential use, but there’s less consensus about how much harm the newer chemicals might do to our health. To be officially organic in Washington State for example, no pressure-treated wood can have contact with the soil or a growing medium. “The National Organic Program Part 205.206f clearly states, ‘The producer must not use lumber treated with arsenate or other prohibited materials for new installations or replacement purposes in contact with soil or livestock.’” (see the Alabama Extension and the Fine Gardening articles listed below).
Perhaps the most toxic options are old creosote-treated crossties or utility poles still oozing tar, used by gardeners for years; but the risk of contaminating the soil is greatly reduced after they weather extensively. It’s small comfort that most plants taking up harmful chemicals would die before producing anything for people to eat. The bottom line is that all treated lumber leaches, although the effect on food seems minimal. That leaves several possibilities for building materials, each necessitating a compromise in durability, expense, appearance or environmentalism:
- Untreated lumber, preferably heartwood from red cedar, redwood or cypress. Some recommend balsam fir and juniper.
- Treated lumber wrapped with heavy plastic on the sides touching the ground.
- Concrete blocks; 16 standard blocks make a 4X8 bed.
- Brick or stone, which necessitates thicker walls.
- Mounding dirt on four sides of the bed, similar to a “hill” for potatoes or cucumbers.
- Plastic wood or wood-plastic composite materials, sometimes available as scrap.
A simple wood frame might have sides made from 1 x 12 or 1 x 8 inch stock held together at the corners with 2 x 4 posts. More durability can be achieved with 2-inch thick lumber for the sides. The 8 or 12 inch height is a choice that depends not only on how much bending the gardener wants to do, but also on the amount of soil available to be placed inside. A 4×8 foot bed uses standard length lumber, but the size really depends on your needs for gardening and landscaping.

Try not to skimp on the quality of soil placed in the bed. Although the bottom of a raised bed is usually open to the ground, most of the nutrition and moisture for your plants will depend on what soil and water you add inside the frame. Working the ground where a raised bed will be sited assures a) better transfer of ground moisture into the bed, and b) space for deep-rooted plants to grow. A good mixture of composted manure and bagged soil, all weed free, will help insure good results. Local dirt may be used if you don’t mind a few weeds; but in any case, the addition of a little vermiculite or perlite to our red clay helps keep the earth more friable for the plants and makes your work easier.

Ideally, leave 3 feet for walking or kneeling on all four sides. The great thing about raised bed gardening is the ease with which plants can be reached for weeding, cultivating, watering, and harvesting. Paths outside the bed can be made softer underfoot with mulch. Wood chips may be free for the asking when a neighbor is having a tree pruned. Grass paths are another way to go.
Options: There’s no magic size for a raised bed. It certainly can be smaller and more like container gardening using concrete or other heavy planters. Higher beds can provide gardening for those in wheelchairs or on walkers. They do require more soil. Albemarle High School has accessible beds constructed from heavy timbers that are three feet high. Whatever size or arrangement you choose, keep in mind how accessible the garden will be for the intended gardener. Some people make their whole garden an array of these beds. For comfort, you can rest a flat board across the frame, providing a temporary seat.
What to grow A 4X8 bed can easily support three or four tomato plants, especially when staked or caged. Most salad greens do well and afford much satisfaction. Carrots can be fun to grow in the amended soil since mine typically struggle in our local clay. Note that the soil in a raised bed will dry out more quickly in summer heat, thus requiring more frequent water; therefore mulching around plants will help. If leaching of treated wood is a concern, be aware that root crops generally absorb the chemicals, although peeling the vegetables removes most of the residual contamination. The main limitation on crops is that taller plants such as corn or okra need more root structure, limiting the size of the crop; but the addition of posts for pole beans or hoops to protect late veggies from frost give added flexibility.
Since a raised bed offers more intensive gardening, interplanting species that mature at different rates becomes possible. For example radishes planted next to beans will be ready to eat before neighboring beans attain full height for harvest. What could be more appealing than a well-tended raised bed overflowing with fresh produce all summer?
Not only vegetables, but also flowers, herbs and other ornamentals can be grown in a raised bed, adding beauty and creativity to any layout. Beds can be large containers, contrived from salvaged materials or built in interesting shapes and sizes. Vines and other greenery can fill in the spaces between blossoming flowers that may be changed to keep the display attractive over the season. Especially for those of us who plan to age in place in our gardens, it’s nice to take a break from weeding while we watch the bees pollinate our lovely flowers.
References
“Treated Wood in the Garden,” Alabama Coop. Ext. (2013)
“Are Pressure Treated Woods Safe in Garden Beds?” www.finegardening.com/pressure-treated-woods
“Raised bed lumber, pressure treated safe?”extension.oregonstate.edu/question-of-the-week/raised-bed-lumber-pressure-treated-safe
“Environmental Soil Issues: Garden Use of Treated Lumber,” extension.psu.edu/plants/crops/esi/treated-lumber
“Raised-Bed Gardening,” extension.missouri.edu/p/G6985
“Gardening in Raised Beds,” Univ. of Fla. Ext.edu (2016)
“Using Treated Lumber in the Garden,” http://web.extension.illinois.edu (2015)
“Gardening in Raised Beds and Containers for Older Gardeners and Individuals with Physical Disabilities,” www.hort.vt.edu (1995)